0 0,00 

Cart

No products in the cart.

SLIM PACK – Wireless controller with 4 programmable paddles, PC/PS4 compatible – Blue

39,90 

  • Lightweight, comfortable and ergonomic.
  • 2.4 Ghz wireless controller.
  • Double vibration system.
  • Touchpad” function button *
  • 4 programmable rear paddles.
  • Charging cable (1 m) included.

*Click button without touch function

Description

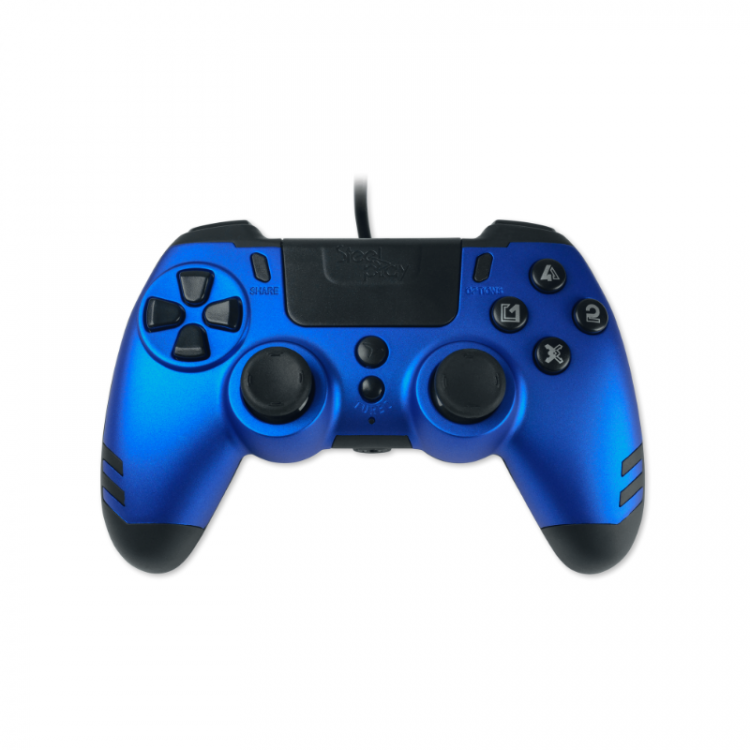
Compatible with PC and PS4, the Slim Pack wireless controller lets you play and personalize your gaming experience to the max. Thanks to the rear paddles, you can perform complex movements without lifting your thumbs from the joysticks.

Additional information

Weight N/A
Dimensions N/A
Colors

Blue, Gold, Red

Platforms

PC, PlayStation

Connectivity

wireless

Applications

Gaming

Downloads

FAQs

Technical support for controllers (9)

CONSOLE CONNECTION

  • First connect the USB wireless adapter to your console’s USB port. (Required)
  • Press the HOME button and the light bar on the controller lights up to indicate a good connection between console and controller.
  • The console automatically recognizes and associates the controller with your user profile. To connect a second controller, create another user profile or use an existing one. You cannot use 2 controllers with a single user profile.

PC CONNECTION

  • Plug the USB wireless adapter into a free USB port on your PC. (Required)
  • After hearing a notification sound, press the Option + PS keys on your controller simultaneously until you hear the notification sound again.

CONSOLE CONNECTION

PC CONNECTION

The M1, M2, M3 and M4 paddles on the back of the controller are programmable to perform the same functions as the action buttons.
They can remap a maximum of 14 buttons.

The M1 palette has the default function of button 1
The M2 palette defaults to the function of button 3.
The M3 palette defaults to the function of button 4.
The M4 palette defaults to the function of button 2.

There are 2 pallet setting modes:

A Remapping mode: 1 or more buttons can be set on 1 palette

Mode B Macro: function sequences of several buttons can be set on 1 palette.

MODE A: REMAPPING
Example of operation on M1 pallet

  1. First press and hold the M1 paddle, then press Share. The turbo LED lights up, indicating programming mode.
  2. Hold down the buttons you wish to map, for example L1 and R2
  3. Press M1 again to confirm the setting, the turbo LED goes out, the setting has been successfully completed. Now if you press the M1 palette, it will have the L1 and R2 functions you have chosen.
  4. Each palette can replace one or more of the following buttons: button 1, button 2, button 3, button 4, L1, L2, R1, R2, right joystick, left joystick, directional cross (up/down/right/left buttons).
    In some games, buttons are already programmed to perform several functions.
  5. Save settings: once you’ve set a palette, it retains the function(s) you’ve set.
  6. Instructions for setting up the other palettes are identical to those above.

MODE B: MACRO

Example of operation on the M1 pallet

  1. First press and hold the M1 paddle, then press Option. The turbo LED lights up, indicating programming mode.
  2. Press any button you wish to set to macro mode, e.g. L1 and R2
  3. Press M1 again to confirm setting; the turbo LED goes out, setting has been successfully completed. Now, if you press the M1 palette, the actions of the L1 and R3 buttons will follow in the order in which you pressed the relevant buttons (if you pressed the L1 button first, then the R2 button, the actions of each of these buttons will follow in this order: L1 action then R2 action).
  4. Each palette can replace one or more of the following buttons: button 1, button 2, button 3, button 4, L1, L2, R1, R2, right joystick, left joystick, directional cross (up/down/right/left buttons).
    In some games, buttons are already programmed to perform several actions.
  5. Save settings: once a palette has been set up, it retains the action sequence(s) set.
  6. Instructions for setting up the other palettes are identical to those above.
  1. First press and hold one of the paddles, then press Share. The LED then lights up, indicating programming mode.
  2. Press the same palette again, and it will no longer replace any other button on your controller.
  3. Repeat the same operation for the other 3 pallets.

Coming soon…

The “Turbo” button has two functions.

  • The first is about pallet programming; when lit, it indicates that pallet programming mode is in progress.
  • The second concerns gameplay: when you use the turbo button and hold down another button on your controller, the action of that button will be repeated continuously.

Hardware required for an update :

  • Computer running Windows 7, Windows 8 or Windows 10
  • Controller and USB dongle
  • Unfolded paper clip, SIM card extractor or other thin, rigid rod

Download file :

> firmware Metaltech Slim Pack wireless

Procedure

  1. Download and unzip the firmware file.
  2. Run the unzipped file.
    • your antivirus software may want to examine it before executing it. Just do it.
    • If Windows asks for permission to make changes to the computer, accept.
      This screen appears:
  3. On the disconnected dongle :
    • locate the small levelling hole.
    • Insert the metal rod: you should feel a slight ‘click’.
  4. Keeping the pin depressed, connect the dongle to the PC.
    • Windows will detect a new device.
    • The update software window will change after a few seconds:

      Click on the “update” button
  5. A progress bar appears:

    Please wait until the software has completed the update process. Do not disconnect the dongle until the procedure has been completed!
  6. When the software has completed the update :

    you can close the software and remove the dongle from the PC. Remove the metal pin and reconnect the dongle to your PC or console, and the controller should be detected.